
 Sign in
 Sign up

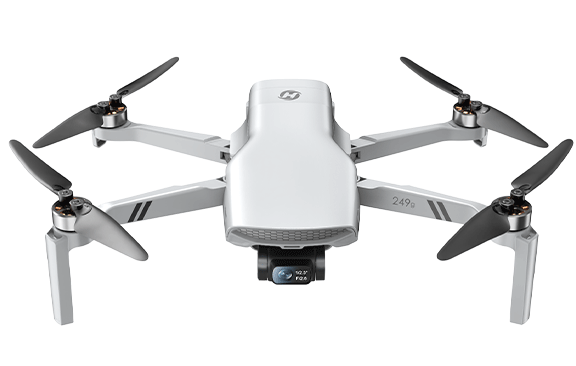
Components of a quadcopter
Drone Components Explained for Beginners: A Kid-Friendly STEM Drone Guide
An easy introduction to how drones are built and how each part works.
Drones are not just fun flying toys — they are powerful STEM learning tools that combine science, technology, engineering, and mathematics. By understanding the main parts of a drone, such as the frame, motors, propellers, battery, sensors, and flight controller, kids can learn how real machines are designed and how different systems work together. This kid-friendly beginner guide explains drone skills, and a strong foundation in STEM.
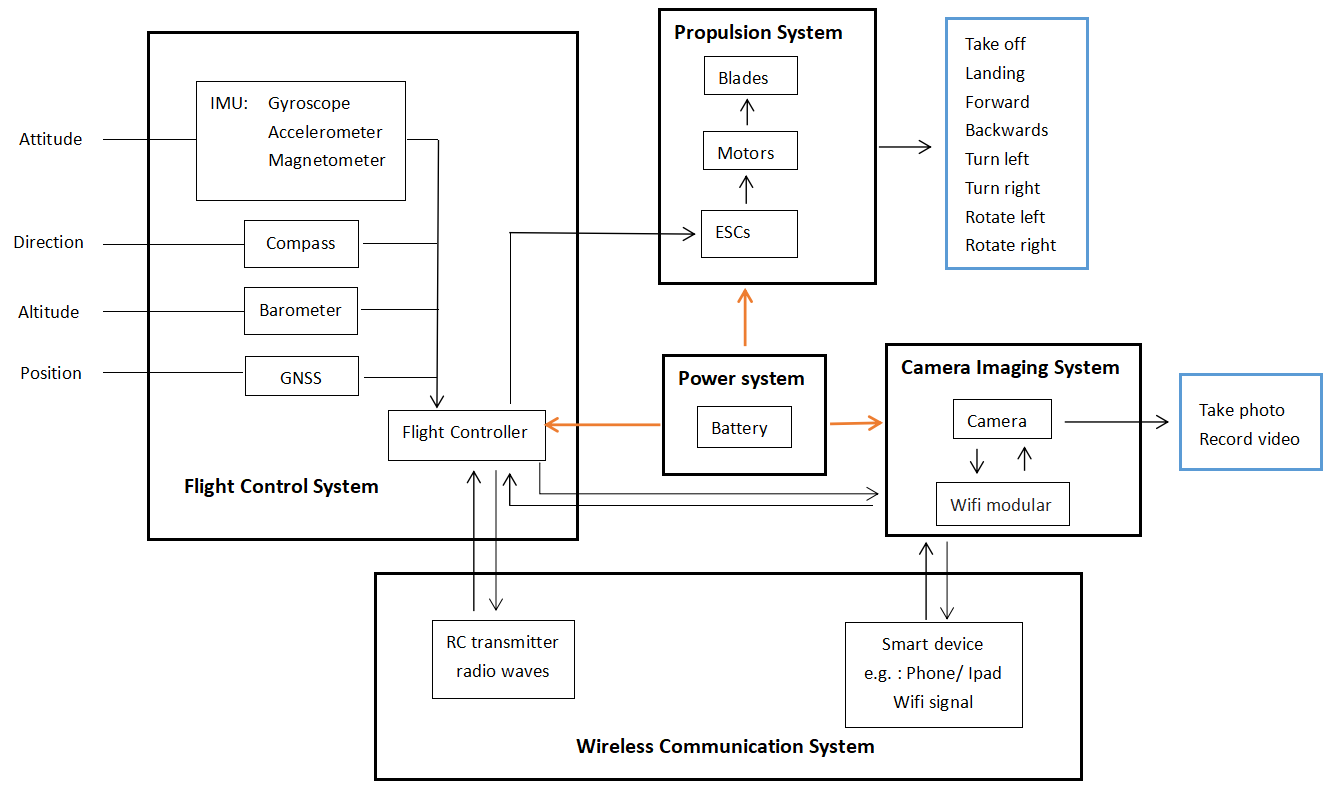
What Are the Main Systems of a Drone?
 #FlightControlSystem
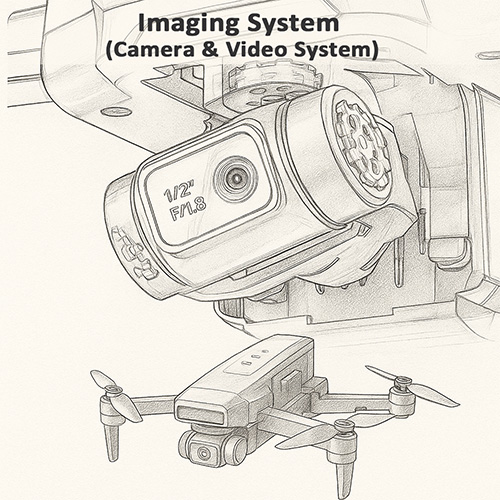 #ImagingSystem
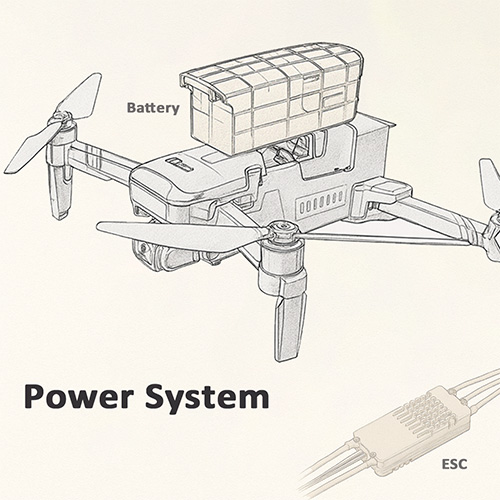 #PowerSystem
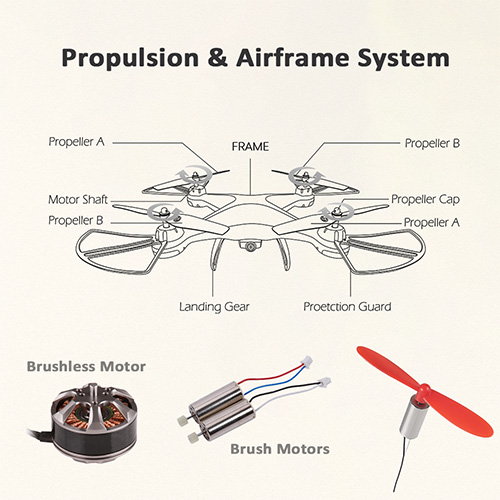 #PropulsionSystem
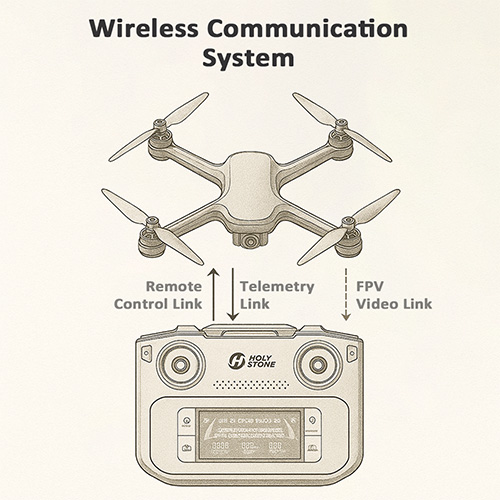 #WirelessCommunicationSystem
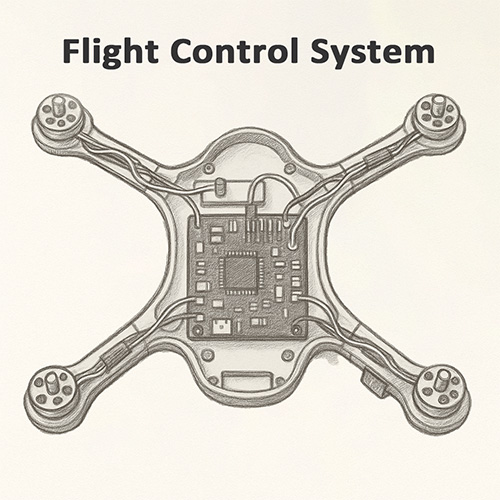
Flight Control System (FCS)
The drone’s Flight Control System (FCS) is a complete control system made up of sensors, algorithms, and control logic that work together to keep the drone stable, controllable, and safe. It processes data related to motion, orientation, magnetic direction, altitude, ground texture, and GNSS position, and uses this information to determine how the drone should behave in real time.
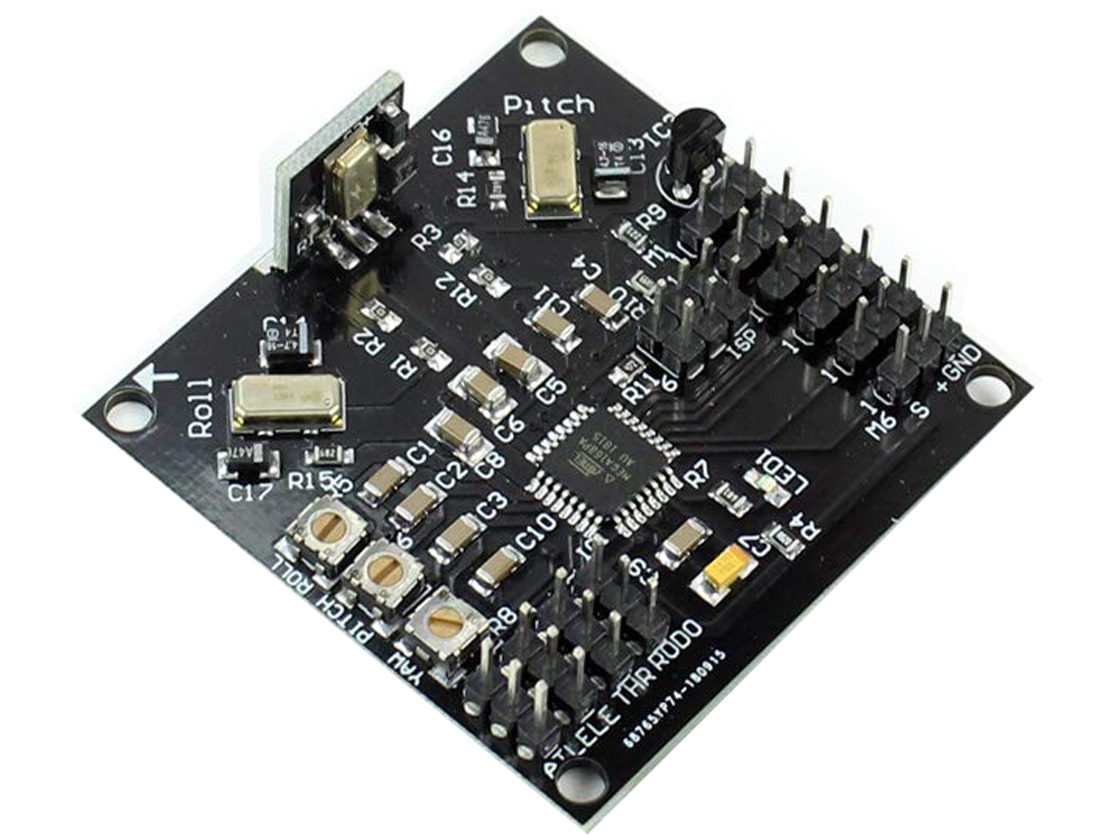
Flight Control Board
The Flight Control Board is the physical hardware that carries and runs the Flight Control System. All critical sensors are mounted on or connected to this board, and its onboard processor executes the FCS algorithms and outputs precise control signals to the motors and electronic speed controllers (ESCs).
What – What is IMU?
IMU = The drone’s balance helper
The IMU (Inertial Measurement Unit) combines gyroscopes and accelerometers to sense how the drone tilts, turns, speeds up, or slows down. It sends this data to the flight controller hundreds of times per second.
Why – Why is the IMU critical for flight stability?
The IMU (Inertial Measurement Unit) is the core sensor system that keeps a drone balanced and stable in the air.
Gyroscope – detects rotation and angular speed.
Accelerometer – measures acceleration and tilt.
Magnetometer – senses direction using the Earth’s magnetic field.
These sensors continuously send motion and orientation data to the flight controller, which performs high-speed calculations and constantly adjusts motor speeds in real time. This is how the drone is able to stay level, respond maintain stable flight without sudden tilting, shaking, or loss of control.
How – How does the IMU work?
When the drone moves, the IMU instantly senses every tiny change in angle, speed, and direction. It sends this information to the flight controller hundreds of times per second. The flight controller then adjusts the speed of each motor in real time to correct the drone’s position. This constant feedback and correction loop is what allows the drone to stay level, respond smoothly to control inputs, and remain stable in the air.
Extra – What is Gyroscope Calibration, and When Should You Do It?
Gyroscope calibration teaches the IMU what “perfectly level and perfectly still” looks like. During calibration, the drone records its zero-movement baseline, allowing it to correctly detect rotation, tilt, and small motion changes during flight.
You should calibrate the gyroscope when the drone shows minor tilt on takeoff, drifts without wind, or after transportation, firmware updates, or mild impact.
Place the drone on a perfectly level, stable surface and start calibration before takeoff. Calibrate after firmware updates, long storage, transportation, or when hovering becomes slightly unstable. Keep the drone completely still throughout the process.
Do Not:
Do not calibrate while holding the drone or on uneven, soft, vibrating, or windy surfaces. Do not perform calibration right after a flight while the drone is warm. Any movement during calibration may introduce errors.
Risk:
Poor gyroscope calibration may cause drifting on takeoff, unstable hovering, slow rotational drift, or inaccurate IMU readings. Proper calibration ensures stable, predictable flight.
What – What is the Compass?
Compass = The drone’s direction guide
The compass is the drone’s direction system. It tells the drone which way it is facing — front, back, left, right, and the directions of north, south, east, and west. Inside the drone, this function is handled by a tiny magnetic sensor called a magnetometer.
Why – Why does the Compass matter for flight direction?
The compass decides where the “nose” of the drone is pointing. It directly affects flight direction, hovering accuracy, and Return-to-Home safety.
It determines whether the drone is flying in the intended direction.
It ensures the Return-to-Home function brings the drone back to the correct position.
It helps prevent the drone from drifting in circles or getting “lost” in the air.
If the compass data is wrong, the drone may drift sideways, rotate by itself, or even try to return in the wrong direction.
How – How does the Compass work?
The magnetometer inside the drone measures the Earth’s magnetic field to determine true direction. The flight controller combines this direction data with IMU and GNSS information to calculate the drone’s heading and movement.
Before takeoff, compass calibration teaches the flight controller what the real magnetic field looks like in the current location. This is why compass calibration is a critical part of flight initialization.
If the compass is not calibrated correctly, the drone may experience circular drifting during hovering — a phenomenon known as the “Toilet Bowl Effect.”
Extra – Compass calibration and the Toilet Bowl Effect (TBE)
Compass calibration is the process of teaching the flight controller what the real Earth’s magnetic field looks like in the current environment. Because magnetic fields change from place to place, the compass needs correct calibration to give accurate heading data.
Safety tip – Where to calibrate the compass
Calibrate the compass in a wide open outdoor area with minimal surrounding metal and electronic equipment. Choose a location with natural ground and clear space, where all potential magnetic and electromagnetic interference sources are far away.
Do Not:
Do not calibrate the compass indoors, on metal floors, on steel rooftops, next to vehicles, or near high-voltage power lines, mobile base stations, radar stations, broadcasting towers, or dense steel-reinforced buildings.
Risk:
Improper compass calibration may seriously distort heading data and trigger the Toilet Bowl Effect, leading to unstable hovering, circular drifting, and abnormal flight paths.
When should you calibrate the Compass?
When the drone is new or has just been repaired.
When flying in a new location far from the last takeoff point.
When the app shows a compass error or abnormal heading warning.
After a crash or strong impact.
What happens if the Compass is not calibrated correctly?
If calibration is skipped or performed in a magnetically polluted area, the flight controller may receive incorrect heading data. This can lead to side drifting, unexpected rotation, inaccurate Return-to-Home direction, or a typical hovering instability called the “Toilet Bowl Effect” (TBE).
What is the Toilet Bowl Effect (TBE)?
The Toilet Bowl Effect describes a situation where a drone, instead of hovering steadily, starts to fly in widening circles around a point — similar to water swirling in a toilet bowl.
Typical flight behavior
The drone slowly rotates by itself.
At the same time, it drifts sideways.
The circular path becomes larger and larger.
What is happening inside the flight controller?
From a flight control perspective, the Toilet Bowl Effect appears when the three core direction systems do not agree with each other:
Compass heading ≠ GNSS motion direction ≠ IMU attitude calculation
The flight controller keeps correcting a drift that does not truly exist. Each wrong correction creates a new error, causing the spiral movement to grow larger and larger over time.
What causes the Toilet Bowl Effect?
Incorrect compass calibration near steel structures, cars, manhole covers, or strong magnetic sources.
Powering on indoors without GPS and then switching to GPS mode outdoors in mid-air.
Magnetic interference from motor current, wiring, or a battery placed too close to the magnetometer.
Physical damage or aging of the compass hardware after crashes or water exposure.
What should pilots do?
If early signs of the Toilet Bowl Effect appear, pilots should:
Land immediately.
Recalibrate the compass in a clean, open outdoor environment.
Check for magnetic interference before continuing the flight.
What – What is the Barometer?
Barometer = The drone’s height sensor
The barometer is the sensor that tells the drone how high it is flying. It does this by measuring changes in air pressure and converting them into altitude information.
Why – Why is the Barometer important for stable altitude?
The barometer allows the drone to hold a steady height in the air instead of rising or falling unexpectedly. This is especially important for indoor flight and beginner-friendly hovering.
It keeps the drone from suddenly shooting upward.
It prevents sudden drops during hovering.
It makes takeoff and landing smooth and controlled.
Without a working barometer, the drone would struggle to maintain a stable height, making flight unsafe and difficult to control.
How – How does the Barometer work?
When the drone takes off, the barometer records the air pressure at ground level as a reference point. As the drone climbs higher, the air pressure becomes lower. The flight controller constantly compares these pressure changes to calculate the drone’s altitude.
If the drone starts to rise or sink unintentionally, the flight controller immediately adjusts motor speed to bring it back to the selected height. This continuous feedback loop is what gives the drone its stable altitude hold.
Extra – When can the Barometer become inaccurate?
In some everyday situations, the air pressure around the drone can change suddenly or become very uneven. This can confuse the barometer and make the reported height less accurate.
Near air-conditioner outlets where strong airflow disturbs pressure.
Directly in front of an electric fan blowing at the drone.
In small enclosed rooms where opening or closing a door changes pressure instantly.
During very fast climbs or drops, where pressure response may lag behind.
When there is a sudden temperature change affecting air density.
Safety tip – Barometer disturbance from strong airflow
In these conditions, the drone may show unstable altitude readings, small up-and-down hovering movements, or incorrect height during automatic landing.
What – What is Optical Flow?
Optical Flow = The drone’s near-ground visual positioning sensor
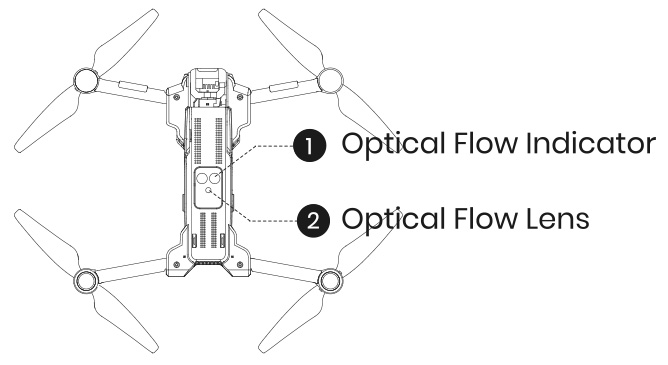
Optical Flow is a visual sensor system that uses a small downward-facing camera to observe how ground textures move beneath the drone. By analyzing these visual changes frame by frame, it can detect whether the drone is drifting left, right, forward, or backward.
The physical location of the Optical Flow module can be seen in the image on the right. While it belongs to the Flight Control System, the Optical Flow sensor is built as an independent hardware module, installed separately from the main flight control board and linked through signal connections.
Why – Why is Optical Flow important for low-altitude stability?
Optical Flow plays a key role in stabilizing the drone during low-altitude and near-ground flight, especially when GPS positioning is weak or unavailable (for example, indoors or close to buildings and trees).
It prevents slow horizontal drifting during hovering.
It improves stability during indoor and low-altitude outdoor flight.
It helps beginners keep the drone steady without constant stick correction.
Without Optical Flow, a drone flying close to the ground would be much more likely to slide across the floor or wander unpredictably due to small air movements or control delay.
How – How does Optical Flow work?
The downward camera continuously captures images of the surface beneath the drone. The system compares how the position of ground features changes from one frame to the next to calculate horizontal motion.
If the drone begins to drift unintentionally, the Optical Flow data is sent to the flight controller, which then adjusts motor output in the opposite direction to lock the drone’s position and maintain stable hovering near the ground.
Optical Flow Positioning is typically used in indoor environments or low-altitude outdoor flight when GPS signals are weak or unavailable. The recommended working height for Optical Flow Mode is approximately 1.6–9.8 ft. In darker environments, you can turn on the lights by pressing the light button on the transmitter to help the camera recognize the ground texture.
Safety tip – When Optical Flow may not work
Avoid flying over featureless, monochrome, repetitive, highly reflective, transparent, water, or moving surfaces. Avoid extremely dark, overly bright, or rapidly changing lighting. Do not fly at excessive low-altitude speed.
Maintenance:
Keep the Optical Flow sensor clean at all times. Do not scratch or tamper with it. Avoid dusty and humid environments.
Fail-Safe Behavior:
If Optical Flow visual data becomes unavailable, the drone will revert to basic altitude-hold mode only. Always fly with extra caution when operating close to the ground.
What – What is GNSS?
GNSS = The drone’s satellite positioning system
GNSS (Global Navigation Satellite System) is the satellite-based positioning system that tells the drone where it is on the Earth. By receiving signals from multiple satellites in space, the drone can calculate:
Its exact location.
Its direction of movement.
Whether it can safely Return-to-Home.
Safety tip – GNSS lock before takeoff
Taking off without a solid GNSS lock may cause drifting, inaccurate Return-to-Home, or unstable positioning.
Safety tip – Environments where GNSS is unreliable
Do not rely on GPS positioning in these environments.
Common GNSS satellite systems used by drones
| System | Country / Region | Description |
|---|---|---|
| GPS | United States | Most widely used global system |
| GLONASS | Russia | Improves positioning stability |
| Galileo | European Union | Very high positioning accuracy |
| BeiDou | China | Strong global and regional coverage |
| QZSS | Japan | Regional signal enhancement system |
Multi-GNSS positioning
Many modern drones use multi-GNSS positioning, such as GPS + Galileo + BeiDou working together at the same time.
Faster satellite lock.
More stable signals.
Stronger resistance to signal blockage.
More accurate Return-to-Home.
Why – Why is GNSS essential for outdoor safety and navigation?
GNSS is the main system that allows a drone to “know where it is” outdoors. It is the foundation for safe, easy-to-use GPS flight modes.
It enables precise position hold in outdoor environments.
It supports accurate Return-to-Home when the pilot presses the button or the signal is lost.
It allows pre-planned routes, waypoint flights, and intelligent flight modes based on map location.
Without reliable GNSS, the drone would drift with the wind outdoors and could not safely return to its takeoff point if the pilot loses orientation or signal.
How – How does GNSS work?
The GNSS receiver on the drone listens to signals from multiple satellites in the sky. By measuring how long each signal takes to arrive, it calculates the distance to each satellite and uses triangulation to determine the drone’s position and ground speed.
The flight controller then fuses this satellite data with information from the IMU and compass to keep the drone locked to a point in space or follow a path on the map. For GNSS to work well, the drone needs an open sky view, enough visible satellites, and a stable “GPS lock” before takeoff.
Extra – When can GNSS become unreliable or fail?
Safety tip – What affects GNSS accuracy
Fly in wide, open outdoor environments where the drone has a clear view of the sky.GNSS works best when satellite signals are unobstructed, free from reflections, and not affected by electromagnetic interference. Before takeoff, wait until satellite searching is complete and the app shows “GPS Ready” / “GPS Locked”.
Do Not:
Do not take off indoors, in underground or semi-enclosed areas, under roofs,inside tree canopies, or inside narrow valleys where satellites are blocked. Avoid flying close to large reflective surfaces such as glass curtain walls, metal roofs, smooth concrete, water surfaces, or clusters of parked vehicles, which may cause multipath reflections. Stay away from high-voltage power lines, mobile base stations, radar stations, and broadcasting towers that may introduce electromagnetic interference.Do not power on the drone indoors and then switch to GPS mode outdoors in mid-air, as this may lead to heading errors and unstable hovering.
Risk:
Poor GNSS conditions may cause drifting, inaccurate Home Point, delayed GNSS lock, unstable hovering, circular drifting (Toilet Bowl Effect), or incorrect Return-to-Home behavior. Always ensure strong and stable GNSS reception before takeoff.
When GNSS conditions are unstable, pilots should avoid relying solely on GPS mode. Keep the drone low and close, or wait until satellite reception becomes stable again before continuing flight.
What – What is the Flight Controller?
Flight Controller = The drone’s flying brain
The flight controller is the onboard computer at the center of the drone. It listens to all the sensors, reads the pilot’s commands from the remote controller or app, and decides how fast each motor should spin to keep the drone flying safely and smoothly.
Why – Why is the Flight Controller so important?
Without the flight controller, all the sensors and motors would just be separate parts. The flight controller turns them into a coordinated flying robot.
It fuses data from the IMU, Compass, Barometer, Optical Flow, and GNSS into one “big picture” of where the drone is and how it is moving.
It translates the pilot’s stick movements and app commands into safe, smooth motions instead of sudden or unstable jumps.
It manages safety features such as Return-to-Home, low-battery protection, and loss-of-signal failsafes.
In short, the flight controller is the reason a modern drone can feel easy and predictable to fly, even for beginners.
How – How does the Flight Controller work?
Inside the flight controller, control algorithms run in a fast loop many times per second. Each loop can be thought of as three simple steps:
1. Read – Collects fresh data from the sensors and reads the pilot’s latest commands.
2. Think – Calculates how much the drone should tilt, climb, turn, or brake to stay stable and follow the commanded path.
3. Act – Sends precise speed changes to each motor (and sometimes to the gimbal) to make the correction happen.
Because this loop runs hundreds of times per second, the flight controller can react to wind gusts, sudden stick inputs, and small disturbances long before most pilots would notice them with their eyes.
Extra – How can pilots help the Flight Controller?
Even the smartest flight controller needs a little help from the pilot to do its job well. Good habits before and during flight make its work much easier.
Perform basic checks: propellers tight, battery locked, and sensors or camera lenses clean.
Complete required calibrations (IMU, compass, etc.) in a suitable environment when the app asks for them.
Wait for a stable GNSS lock and enough satellites before taking off outdoors.
Avoid flying in places with strong magnetic or radio interference that can confuse the sensors.
When pilots follow these steps, the flight controller can fully use all six key modules to keep every flight safer and more enjoyable.
Imaging System (Camera & Video System)
The drone’s Imaging System is the part that decides what you actually see in your photos and videos. It is made up of the camera sensor, lens and field of view (FOV), image stabilization system (EIS or gimbal), image processor (ISP), video resolution and frame rate settings, and the FPV live video transmission link.
What – What is the Camera Sensor?
Camera Sensor = The drone’s electronic eye
The camera sensor is the heart of the imaging system. It is a small electronic chip (usually a CMOS sensor) that turns incoming light into electrical signals and then into digital image data. Its size, design, and quality largely determine how clear, clean, and detailed your photos and videos will be.
In practice, when people talk about “how good the sensor is”, they are usually talking about five core, easy-to-understand aspects:
1. CMOS technology – the manufacturing process of the sensor. Modern CMOS sensors are more sensitive, use less power, and read out image data faster, which helps with low light and high-frame-rate video.
2. Pixel count (megapixels) – how many tiny light-sensing cells (pixels) the sensor has, for example 12MP, 20MP, or 48MP. More pixels allow higher resolution images, but only work well when combined with a good sensor size and design.
3. Sensor size – the physical area of the sensor, often written as 1/2.3", 1/2", 1", etc. A larger sensor can collect more light per frame, which improves detail, dynamic range, and low-light performance.
4. Pixel / circuit design – how each pixel and the surrounding circuitry are laid out on the chip (for example front-illuminated vs back-illuminated, stacked structure, etc.). Better designs allow each pixel to “catch” more light and reduce noise and artifacts.
5. Output capability – what the sensor + image pipeline can actually deliver: maximum photo resolution, video formats (such as 4K / 2.7K / 1080p), supported frame rates, and how clean and natural the final image looks.
Together, these five factors decide how much light the sensor can capture and how good the final image quality can be, far beyond just a single “MP” number on the spec sheet.
Why – Why experienced pilots care more about the sensor than the “megapixel number”
In the aerial photography community, any pilot with a bit of experience knows that the “4K” and “48MP” numbers in ads are only surface specs. The real limit of image quality is set by the sensor size, pixel structure, and underlying light-gathering ability, not by the megapixel label alone.
A larger sensor collects more light. This means cleaner shadows, better detail, and wider dynamic range, especially in complex lighting.
Cramming too many pixels into a very small sensor (common on 1/5'' or 1/6'' “toy-grade” sensors) makes each pixel extremely tiny. Low-light noise goes up, fine detail gets smeared, and night scenes often look worse, not better.
This is why two drones that both say “4K” on the box can sit in completely different image-quality leagues once you actually fly and compare the footage.
In the $50–$120 price band, it is almost impossible to find a true native 4K sensor. Around 90% of the “high-resolution” claims are really a mix of software upscaling, ultra-small CMOS sensors, and heavy algorithmic sharpening. The image is largely “built” by software instead of captured by strong hardware.
At higher price levels, sensor size and pixel design usually become more reasonable. Only then do you start to see cameras that can genuinely deliver the 4K performance their spec sheet promises.
For experienced pilots, a well-tuned 12MP or 20MP sensor with a decent-sized “bottom” is often far more valuable than a hyped “48MP” sensor that relies on pixel stuffing and interpolation.
In short, megapixels are just the result number. The sensor is the physical foundation that decides whether your drone can actually capture beautiful, clean footage in the real world.
How – How does the camera sensor work inside a drone?
During flight, light from the scene passes through the lens and falls onto the camera sensor. Each tiny pixel on the sensor measures how much light it receives and converts this into an electrical signal. The image processor then reads this data line by line to build a full-resolution image or video frame.
This process repeats many times per second. For example, when recording 4K 30fps, the sensor is creating and sending 30 full 4K frames every second to the image processor.
Extra – Common myths about drone camera sensors
Myth 1: “More megapixels always means better image quality.” Reality: On small drone sensors, overly high pixel counts can reduce sensitivity and increase noise.
Myth 2: “Two drones with 4K sensors must have similar image quality.” Reality: Sensor size, pixel design, and image processing make a huge difference between brands and models.
Myth 3: “Daylight shots look fine, so the sensor must be great.” Reality: A strong sensor really proves itself in high-contrast scenes (bright sky + dark trees) and at sunset or night.
What – What is Field of View (FOV)?
FOV = How wide the drone camera can see
Field of View (FOV) describes how wide the camera can see and is measured in degrees. A larger FOV means the camera captures more of the scene in a single frame; a smaller FOV shows a tighter, more focused view.
FOV directly affects image width, distortion, perspective, and immersion. It is one of the key lens parameters that define the “style” of your footage.
In the drone world, it is important to separate two very different design goals:
Aerial camera drones – aim for natural, low-distortion footage for travel, landscape, and city shots. Most consumer aerial drones use a moderate FOV, typically in the ≈80°–90° range.
FPV / racing drones – use much wider, more distorted FOV, often above 120°, to maximise immersion, speed feeling, and awareness of obstacles during high-speed flying.
The same word “FOV” can therefore describe very different experiences, depending on whether the drone is built for cinematic aerial imaging or FPV-style flying.
Why – Why does FOV matter when choosing a drone?
FOV directly defines how your footage feels: whether it looks natural and comfortable to watch, or extreme and immersive like an action camera or FPV feed.
Standard aerial FOV (≈80°–90°) – this is the “sweet spot” for everyday aerial footage. It looks close to human vision, keeps buildings straight and horizons level, and gives a wide but not exaggerated perspective. Many mainstream camera drones fall roughly in the 82°–86° range.
Narrower aerial FOV (≈72°–80°) – used on some higher-end, cinema-oriented lenses. It reduces distortion even further, strengthens subject separation, and creates a more “compressed”, film-like perspective that works very well for architecture and storytelling shots.
Ultra-wide FPV FOV (≈145°–170°) – common on freestyle and racing FPV drones. It shows a huge amount of the surroundings and strongly enhances speed and immersion, but with clearly visible “fisheye” curvature at the edges.
Wide FPV / action FOV (≈120°–140°) – often used on cine-FPV setups to balance immersion and control. Distortion is still present but can be managed more easily in post-processing.
This is why experienced pilots always look at FOV and real sample footage, not just resolution or megapixel numbers. The same “4K” with different FOV can feel like a cinematic movie, a natural travel vlog, or a wild FPV ride.
How – Typical FOV choices for aerial drones and FPV drones
Aerial camera drones (cinematic / travel use)
Most consumer aerial drones use an effective FOV around 80°–90°. This range gives a wide, immersive view while keeping distortion low enough for natural-looking landscapes and city shots.
Some premium aerial cameras use a slightly narrower FOV (around the 70°–78° range). This gives straighter lines, stronger subject separation and a more controlled, cinematic perspective compared with the typical 80°–86° aerial FOV.
FPV / racing drones (immersion and speed)
Freestyle / racing FPV drones commonly run ≈145°–170° FOV. This ultra-wide view maximises peripheral vision and safety when flying fast and close to obstacles, at the cost of strong fisheye distortion.
Cine-FPV builds often choose lenses or modes in the ≈120°–140° FOV range to keep the immersive feel while making distortion easier to control or correct in post.
Because the design goals are so different, a “good” FOV for an FPV drone is usually far too wide and distorted for a classic aerial camera drone, and vice versa.
Extra – Practical FOV tips when comparing drone cameras
If you mainly want cinematic travel footage – choose an aerial camera drone with FOV around 80°–90°. This range is wide enough for landscapes but keeps distortion low, which makes long videos more comfortable to watch.
If you prefer straighter lines and a more “cinema” look – consider models using a slightly narrower FOV (around the 70°–80° band). You may need to fly a bit farther back to fit everything in the frame, but buildings and horizons will look very clean.
If a non-FPV camera drone claims very wide FOV (for example, over ≈100° and closer to action-cam numbers), be cautious. It may rely heavily on software distortion correction or produce stretched edges that feel more like an action camera than classic aerial photography.
For FPV-style flying, very wide FOV (often ≥145°) is normal and actually helpful. Just remember that such footage will naturally look more curved and “fish-eye” compared to standard aerial shots.
Always check sample videos. FOV is not a “bigger is better” parameter – it is about whether the perspective matches the style of footage you actually want to create.
In summary, resolution and sensor quality decide how sharp and clean your image is, but FOV decides whether it feels like a natural aerial scene, a cinematic frame, or an FPV ride.
What – What is Image Stabilization?
Stabilization = Keeping your footage steady, level, and watchable
Image stabilization refers to the technologies that keep your drone footage smooth and stable, even when the drone is affected by wind, vibration, acceleration, or sudden stick movements.
In consumer drones, stabilization mainly comes in two forms:
EIS (Electronic Image Stabilization) – an algorithm-based method that corrects shake by analysing each frame and compensating through cropping and remapping.
Three-axis mechanical gimbal – a hardware system with motors that physically keep the camera level and isolated from drone movement.
Both aim to produce smooth video, but their performance, cost, and target users are very different. Understanding how each type works is key to choosing the right drone.
Why – Why does stabilization matter?
No matter how good the sensor or how high the resolution is, unstable footage is difficult to watch. A drone in flight constantly experiences:
Wind and air turbulence
Motor vibration and micro-oscillation
Sudden braking, acceleration, and turning
Rolling shutter distortion (“jello” effect)
Without stabilization, the footage will shake, tilt, wobble, and distort. This is why experienced pilots often say:
“Stability matters more than resolution.”
Stabilization is the foundation that determines whether your 4K sensor can actually produce footage that looks smooth and cinematic.
How – EIS vs Gimbal: which one should you choose?
EIS (Electronic Image Stabilization)
How it works: The camera captures a slightly larger image and uses algorithms to track motion, then digitally compensates for shake through cropping and frame-to-frame warping.
Strengths: lightweight, durable, budget-friendly, ideal for beginner drones and sub-249g designs. Models like the HS720E (Big Promotion Now!) HS175G and HS360E use true high-grade EIS.
Limitations: small loss of field of view due to cropping, less effective in strong wind or heavy motion, cannot perfectly maintain horizon level, reduced performance in low light.


Three-axis mechanical gimbal
How it works: Three brushless motors actively stabilise the camera in pitch, roll, and yaw, physically cancelling out drone movement.
Strengths: best possible stability, straight horizons, no cropping, excellent low-light performance, ideal for cinematic footage. Available on models like the HS900, HS790, and HS600.
Limitations: higher cost, more complex hardware, slightly heavier, and more vulnerable to impact.
In practical terms:
EIS = smoother footage for lightweight and beginner drones
Gimbal = true cinematic stability for creators and travelers


If your goal is casual flying or travel snapshots, EIS drones like HS175G and HS360E offer excellent value. If you want publish-ready video, clean horizons, and stable low-light footage, a gimbal drone such as HS900, HS790, or HS600 is the better choice.
Extra – Why do true EIS drones often cost over $200?
Many low-priced drones claim to offer EIS, but their effect is often minimal. High-quality, real-time EIS requires a series of hardware and software upgrades that significantly increase cost:
More powerful ISP / SoC – real EIS requires intensive motion estimation, warping, and rolling-shutter compensation, which entry-level processors cannot handle.
Higher-speed image sensors – fast readout reduces jello effect; these sensors cost more than basic 4K chips.
Higher bandwidth and encoding performance – true 4K EIS demands stronger transmission hardware and higher-bitrate video encoding.
Advanced algorithm tuning – optical flow, lens distortion models, motion curves, and stabilization matrices require extensive engineering and calibration.
This is why drones that deliver noticeably stronger, more reliable EIS — such as the HS175G and HS360E — naturally sit in the $200+ performance bracket, while cinematic users may choose to step up to gimbal drones like the HS900, HS790, or HS600.
In short, stabilization determines whether your footage is simply “usable” or truly “beautiful”, and choosing the right type will dramatically shape your aerial video experience.
What – What is the Image Signal Processor (ISP)?
ISP = The “image brain” that turns raw sensor data into a finished image
The Image Signal Processor (ISP) is the processor that interprets the data coming from the camera sensor and transforms it into the final photo or video you see. It controls how the drone handles color, brightness, noise, dynamic range, detail sharpness, and even stabilization performance.
Although drone spec sheets rarely mention ISP details, it is one of the most important components of the entire imaging pipeline. Two drones with the same “4K sensor” can deliver completely different image quality because of the strength of their ISP.
Why – Why does ISP matter for drone image quality?
The ISP determines how well the camera can handle real-world challenges. It directly affects five major aspects of image quality that consumers can clearly see:
1. True detail and sharpness – A strong ISP preserves fine textures and edges instead of producing the “soft 4K” or “watercolor effect” common in budget drones.
2. Noise handling and night performance – ISP controls noise reduction, exposure, and tone mapping. A weak ISP creates noisy, smeared low-light footage; a strong ISP keeps the image clean with natural detail.
3. Color accuracy and style – ISP defines the “look” of the footage. Colors may appear natural, cinematic, punchy, or sometimes tinted if the ISP is not well tuned.
4. Dynamic range and highlight recovery – A good ISP prevents blown-out skies and crushed shadows, especially when shooting against bright sun or reflective surfaces.
5. Stabilization performance – EIS relies on ISP processing power. Strong ISPs enable high-quality EIS; weak processors cause rolling-shutter wobble, latency, or ineffective stabilization.
This is why two drones with identical resolutions can look dramatically different in real-world footage. The ISP determines whether “4K” actually looks like 4K.
How – How ISP shapes what you see in real footage
Key ISP tasks that influence drone video quality
Denoising and sharpening – finding the right balance between preserving detail and smoothing noise.
Color processing – tuning white balance, contrast, saturation, and tonal response to create a consistent “look”.
HDR and exposure control – merging tonal information to handle bright skies and dark ground simultaneously.
Motion analysis for EIS – enabling stabilization algorithms to track motion correctly and avoid jello artifacts.
Lens correction – compensating for distortion or chromatic aberration, especially in wide-angle lenses.
In practice, these processes work together to give each drone its unique “image personality.” A drone with a strong ISP will produce cleaner, more cinematic footage even with the same hardware as a cheaper model.
What – What are Resolution and Frame Rate?
In the previous section, we introduced Megapixels (MP) — the amount of raw information a camera sensor can capture. But megapixels alone do not decide how your final video looks. The actual visual quality on your screen is determined by two key output parameters: Resolution and Frame Rate (FPS).
Resolution refers to how many pixels each frame contains, measured as Width × Height. Higher resolution means more spatial detail and a clearer image.
Frame Rate (FPS) refers to how many frames are displayed per second. Higher FPS gives smoother motion and reduces motion blur in fast scenes.
In short:
Megapixels = the camera’s potential
Resolution + Frame Rate = the real-world video performance
This is why a 48MP sensor does not automatically produce better video than a 12MP sensor. What truly matters is whether the drone can stably output high resolution (e.g., 4K) at a suitable frame rate (e.g., 30fps/60fps).
Most “8K” claims seen on shopping platforms are not true 8K video. They often use software upscaling, interpolation, or enlarged still frames instead of recording real 7680×4320 footage.
Don't Be Misled:
If a drone's official video specifications list 4K, 2.7K, or 1080P as the maximum video resolution, then it cannot shoot real 8K video — regardless of what the product title or banner advertises. Always check the “Video Resolution” section.
Reality Check:
True 8K recording requires extremely powerful processors, high-bandwidth storage, and professional-grade sensors. Only a few high-end drones, such as the DJI Inspire 3, can produce real 8K video. For most consumer drones, “8K” is marketing exaggeration rather than actual performance.
Why – Why do Resolution and Frame Rate matter when choosing a drone?
Resolution determines how clear your footage looks, while frame rate determines how smooth it feels. Both strongly affect the viewing experience, especially for travel, cinematic, or action-style shots.
Resolution presets (how clear each frame is)
1080P (1920×1080) – good for beginners; small files; enough for casual flying.
2.7K (2720×1530) – the “sweet spot”; noticeably sharper than 1080P; easier to process than 4K.
4K (3840×2160) – best for travel and landscape shots; excellent detail and cropping flexibility.
Frame rate presets (how smooth the motion feels)
24fps – cinematic motion; ideal for storytelling.
30fps – natural and stable; suitable for most aerial shots.
60fps – very smooth; perfect for fast movement, chasing shots, or sports scenes.
Choosing the right combination ensures your footage looks both clear and pleasant to watch.
How – How to choose the right Resolution + FPS for your needs?
Recommended combinations for different use cases
Travel, landscapes, city shots – choose 4K 30fps.
Vlog, people, slow flying – choose 2.7K or 4K 30fps.
Chasing bikes, cars, action scenes – choose 1080P or 2.7K 60fps.
Beginners or casual flying – 1080P 30fps is sufficient.
Editing / cropping – choose 4K 30fps or 60fps.
While 4K 30fps offers technically higher resolution, 2.7K 30fps is often the more practical choice for most users, especially on today’s short-video platforms.
In Practice:
Social apps like TikTok, Instagram, YouTube Shorts, and Facebook heavily compress uploads. After compression, the visual difference between 4K and 2.7K becomes small, but 4K files remain much larger and slower to upload, transfer, and edit.
Tip:
For everyday creators, travelers, and social media users, 2.7K 30fps usually offers the best balance of clarity, file size, and editing performance — making it the real-world “sweet spot” for aerial video.
Typical file sizes (per ~1 minute of video)
| Resolution | 30fps | 60fps |
|---|---|---|
| 1080P | ~90MB | ~180MB |
| 2.7K | ~200–260MB | ~400–520MB |
| 4K | ~350–750MB | ~700MB–1.5GB |
A simple rule of thumb:
When shooting scenery — prioritize resolution.
When shooting motion — prioritize frame rate.
Extra – Practical tips for comparing Resolution and FPS across drones
Stability matters more than raw resolution — stable 4K 30fps beats shaky 4K 60fps.
60fps increases processing load — more CPU/GPU usage, more EIS workload, more battery drain, larger files.
Phone screens show limited difference — 1080P/2.7K/4K look similar on small screens; differences appear on PCs/TVs.
If “4K footage” looks soft — the drone may use low bitrate or heavy compression. Check sample footage.
60fps for action — lower resolution + higher FPS often looks better than high resolution + blur.
Storage matters — 4K files are large; 1080P is easier to save/share.
In summary, resolution defines clarity, and frame rate defines smoothness. Choose according to shooting needs, stabilization performance, and storage limits.
What – What is FPV live video transmission?
FPV Transmission = The live link between the drone and your screen
FPV (First-Person View) transmission is the wireless system that sends a live video feed from the drone’s camera to your smartphone or remote controller screen while you fly. It is separate from the high-quality video that is recorded onto the SD card.
When you fly, the drone is doing two things at the same time:
Recording video – usually at high quality (for example 4K / 2.7K / 1080P) onto the SD card.
Streaming FPV video – a compressed live feed (typically around 720P) sent over the air to your controller and phone.
FPV transmission is therefore best understood as a live, low-latency preview optimised for control and safety, not as a raw 4K video feed.
Why – Why are latency and signal quality so important?
A clear and responsive live view is essential for safe and enjoyable flights. FPV transmission controls whether the image on your screen is timely, stable, and reliable — or delayed, blocky, and frequently disconnected.
Low latency means the image on your screen closely matches the drone’s real-time position. Lower latency makes the drone feel directly connected to your sticks and is critical for precise flying.
Stable signal helps avoid image freezes or heavy blocky artifacts when the drone is far away, especially in Wi-Fi-crowded environments.
Good FPV quality is especially important when flying near obstacles or when framing precise shots, because you are relying entirely on what you see on the screen.
Range and penetration determine how far you can fly before the FPV feed becomes weak or unusable, particularly around buildings, trees, and other obstacles.
Device performance also matters: your phone or tablet must decode the FPV stream. Weak devices can introduce extra lag, stutter, or overheating even if the radio link itself is good.
In practice, a drone with modest recording specs but strong FPV transmission is often much easier and safer to fly than a “4K marketing monster” with poor, unstable FPV.
How – How does FPV transmission work on a drone?
From camera to screen: the FPV signal chain
The drone compresses the camera signal into a live video stream and sends it over a wireless link, usually using 2.4GHz or 5GHz frequencies. The receiver in the remote controller or phone decodes this stream and shows it as the FPV image.
A typical consumer FPV pipeline looks like this:
The camera sensor captures each frame.
A video chip compresses the frames into a live stream (usually around 720P at 24–60fps).
A radio module sends this stream over 2.4GHz and/or 5GHz bands to the remote controller.
The controller forwards the data to your phone/tablet, where the app decodes and displays the FPV image.
More advanced digital systems use techniques such as channel hopping, forward-error correction, and smart bitrate control to keep the video stable over longer distances and in noisy environments.
For best results, pilots should:
Fly with the antennas oriented correctly as described in the manual, instead of pointing them directly at the drone.
Avoid flying behind large buildings, trees, or metal structures that block or reflect the signal.
Keep away from strong Wi-Fi interference when possible, especially in crowded city areas or apartment blocks.
On almost all consumer camera drones today, the FPV preview is around 720P, even if the drone records 4K or higher to the SD card. The live FPV feed is optimised for low latency and reliability, not for maximum resolution.
Don't Be Misled:
Phrases like “4K FPV” or “8K live view” in product titles are usually marketing exaggerations. Always check the actual FPV or “live view” resolution in the specifications instead of trusting banner slogans.
Reality Check:
Pushing true 1080P or higher FPV would require much more bandwidth, processing power, and battery, and would significantly increase delay and dropouts. That is why even many flagship drones still use 720P-class FPV for real-time control.
Extra – Practical FPV tips when comparing drones
Prioritise transmission quality over pure resolution numbers. A drone with solid 720P FPV and low latency is far more usable than a “spec sheet hero” that constantly freezes or drops signal.
Look at the transmission system, not just “max range”. Claims like “up to 1km” are usually measured in ideal open fields. In real cities with Wi-Fi and buildings, usable FPV range can shrink to a few hundred metres or less.
Keep clear line-of-sight whenever possible. Trees, walls, cars, and even your own body can strongly weaken FPV signals. If you cannot see the drone, the FPV link is often already in a worse condition.
Use a capable phone or tablet. Low-end devices can add their own lag and stutter, making FPV feel worse than the radio link actually is.
Check sample FPV footage, not just marketing images. Many promo screenshots are taken from SD card recordings, not from the real-time FPV feed.
Remember the key rule: if you mainly care about safe, confident flying, then FPV latency and stability are more important than chasing the highest advertised FPV resolution.
In summary, FPV transmission is the invisible bridge between your drone and your hands. A strong, low-latency FPV link makes flying easier, safer, and more enjoyable — and is one of the most important factors to consider when choosing a drone.
Power System (Battery & Power Delivery)
The drone’s Power System is the part that stores, delivers, and manages electrical energy. It includes the battery pack, electronic speed controllers (ESCs), power distribution wiring, connectors and cables, and the monitoring and protection circuits that keep everything safe. Together, these components decide how long the drone can fly and how reliably the motors receive clean power.
What – What is the battery pack?
The battery pack stores the electrical energy that keeps a drone flying
A drone battery pack is a rechargeable unit that supplies power to the motors, camera, flight controller, GPS, and lights. Without a battery, the drone cannot lift off or stay in the air.
The most important idea related to batteries is flight time. This means how long one battery can keep the drone flying before it must land. Flight time depends on many factors – battery size, drone weight, flying speed, temperature, wind, and video recording.
Common flight time ranges in consumer drones:
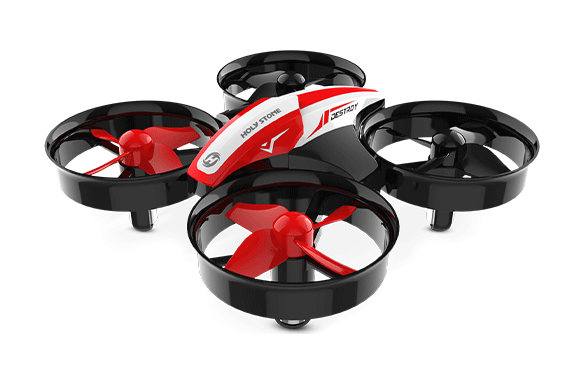
Mini toy drones: 5–10 minutes
Beginner non-GPS drones: 12–18 minutes
249g GPS camera drones: 20–30 minutes
Larger camera drones: 30–40 minutes or more
Flight time in advertisements is usually measured under ideal test conditions. Real outdoor flight times are almost always shorter.
Battery features to look at when choosing a drone:
| Concept | What it means | Simple analogy |
|---|---|---|
| Capacity (mAh) | Shows how much electric charge the battery can store. A higher number can support longer flight, as long as the drone is not too heavy. | Like how much water a bucket can hold. 1,000mAh is a small bucket, 3,000mAh is a bigger bucket that can supply water for longer. |
| Energy (Wh) | Total energy of the battery, calculated from voltage and capacity. A better way to compare real flight potential between different batteries. | Like how long one full bucket of water can be used to water plants. Higher Wh means you can “water” (fly) for a longer time, not just store more water. |
| Voltage (e.g. 7.4V vs 11.1V) | Defines the power level of the system and affects motor speed, thrust, and how much current is needed for the same power. | 7.4V is like riding a bike in a low gear – smooth and enough power for light use. 11.1V is like a higher gear – stronger push and faster speed, especially helpful in wind. |
| Battery count (1 vs 2 batteries) | Tells you how many full batteries are provided, which affects total flying time in one session. | One battery is like bringing one full water bottle – when it is empty, you must stop. Two batteries are like bringing two bottles, so you can keep going much longer without refilling. |
| Cell structure (2S vs 3S) | Shows how many cells are connected in series inside the pack. More cells give higher voltage and stronger power output. | 2S (about 7.4V) is like a two-step pump – it pushes water reliably with moderate force. 3S (about 11.1V) is like a three-step pump – it builds higher pressure and can spray water farther and harder. |
| Chemistry (Li-ion vs Li-Po) | Describes the battery material system, which affects weight, energy density, discharge ability, and lifetime. | Li-ion is like a big water tank – it stores a lot of water and can supply for a long time, but the flow is softer. Li-Po is like a pressure sprayer – it holds less water, but the spray is stronger and faster. |
| Smart battery (with BMS) | A battery with built-in electronics to measure charge level, balance cells, and help protect against damage. | Like a bucket with clear markings and a safety valve – you can see how much water is left and avoid spills or overfilling. A non-smart battery is like a plain metal bucket where you must guess. |
| Discharge rate (C-rate: high C vs low C) | Shows how quickly the battery can safely release its power for climbs, fast moves, and strong wind. | A high C-rate is like a thick hose that can blast out a lot of water very quickly. A low C-rate is like a thin hose that only allows a gentle stream of water. |
| Cycle life (e.g. 100–200 cycles) | How many full charge and discharge cycles the battery can go through before the flight time noticeably drops. | Like how many times you can fill and empty a bucket before it starts to crack or leak. More cycles mean the “bucket” lasts longer in daily use. |
| Battery weight (light vs heavy) | Heavier batteries can store more energy but make the drone work harder to stay in the air, which can reduce efficiency. | Like hiking with or without a heavy water backpack. Carrying more water lets you go longer, but it also makes every step more tiring. |
| Temperature behavior (cold vs hot) | Shows how much battery performance changes in cold or hot weather, affecting flight time and safety. | In the cold, it’s like water turning slushy and flowing slowly, so the drone flies for a shorter time. In extreme heat, it’s like water steaming away faster, which can age the battery more quickly. |
Why – Why does the battery pack matter?
The battery has a strong impact on the whole flying experience. A good battery means longer flights, safer returns, and smoother power delivery. A weak or poorly cared-for battery shortens flight time and increases risk.
Flight time depends directly on how much energy the battery can safely provide.
Performance depends on stable voltage, so the motors and camera get steady power.
Safety depends on keeping the battery within a healthy range, not too full and not too empty.
How – How should drone batteries be used and stored?
Simple habits can help drone batteries last longer and stay safer to use:
Before flying: use batteries at room temperature and avoid taking off with very low charge.
During flying: try not to drain the battery to 0%. Most pilots recommend landing around 20% remaining.
After flying: if you will not use the drone for weeks, store the battery at about 40–60% charge, away from extreme heat or cold.
Following these steps helps keep the battery healthy, improves safety, and protects long-term flight performance.
Extra – Common questions about drone batteries
Q: Why can’t drones fly for a very long time?
A: Drone motors use a lot of power to keep the aircraft in the air. To protect the battery, the drone needs to land before the battery is completely empty.Q: Why is real flight time shorter than the number in ads?
A: Advertised flight time is tested in perfect conditions, usually indoors with no wind. Outdoor flights have wind, speed changes, and video recording, which all use more power.Q: Is it safe to fly until the battery reaches 0%?
A: No. Very low charge can damage the battery and may cause sudden power loss. It is safer to land when the battery is around 20%.Q: How long can a drone battery last over its lifetime?
A: With good care, many drone batteries can handle about 100–200 full charge cycles before the flight time starts to drop clearly.Q: Why store batteries at about half charge?
A: Keeping batteries at around 40–60% charge during long breaks reduces stress on the cells and helps them age more slowly.Q: Does cold weather reduce flight time?
A: Yes. Lithium batteries work less efficiently in cold temperatures, so the drone will usually fly for a shorter time in winter.
What – What is an ESC (Electronic Speed Controller)?
ESC = An electronic system that controls motor speed and power output, acting as the “power translator” between the battery and the motors.
The ESC (Electronic Speed Controller) receives flight-control commands and converts them into fast, precise electrical signals to drive each motor. It enables the drone to take off, hover, turn, brake, and hold stable flight attitude.
In brushless drones, each motor typically has its own dedicated ESC channel. For example, a quadcopter uses four ESCs that work together to deliver stable and responsive flight performance.
Important note: Brushless motors require dedicated ESC units to operate, while brushed motors also rely on speed control—but this circuitry is usually built into the main flight board, so users do not see a separate ESC module.
Why – Why is the ESC critical for smooth flight control?
The ESC regulates each motor’s RPM and thrust output, directly affecting ascent, descent, rotation, and braking control.
A high-quality ESC reacts within milliseconds to assist the flight controller in correcting tiny attitude deviations, resulting in smoother hovering and more precise turns.
ESCs also include multiple protection functions such as over-current, over-temperature, and short-circuit protection to safeguard the power system.
Impact – What role does the ESC play in real flight performance?
ESCs have a direct impact on overall flight quality and handling feel, primarily through the following aspects:
Stability – Precise RPM control allows the drone to hover steadily and execute smooth directional changes.
Response speed – Takeoff punch, braking performance, and wind resistance are closely related to ESC reaction speed.
Efficiency – A high-efficiency ESC reduces energy loss, helping actual flight time match rated endurance more closely.
Reliability – Current and temperature management lowers overload risk and extends motor and system lifespan.
This is why two drones with similar specifications may feel completely different in the air — the ESC quality often makes the difference.
How – How does an ESC operate inside each control loop?
During each control cycle, the flight controller sends explicit RPM commands to the ESC (e.g., “Motor #1 power: 65%”). The ESC then drives the motor coils through rapid voltage switching.
This process is typically based on PWM or FOC motor control. By adjusting pulse timing and duty cycles, the ESC enables smooth acceleration and deceleration, resulting in quieter, more stable, and highly efficient motor operation.
What – What is power distribution?
Power Distribution = The “electrical roads” inside the drone
Power distribution is the network of boards and thick copper wires that carry battery power to each ESC, motor, and low-voltage module. Many drones use a Power Distribution Board (PDB) or a combined flight-controller-plus-PDB board.
Why – Why does clean power distribution matter?
Proper wire thickness prevents overheating during high-current climbs.
Good layout reduces electrical noise that could disturb the GNSS, compass, or FPV signal.
Built-in voltage regulators can provide stable 5V or 12V for cameras, receivers, and LEDs.
How – How does power flow through the drone?
From the battery connector, power first enters the power distribution board. Thick traces or wires branch out to each ESC and motor. At the same time, smaller regulators step the voltage down to levels suitable for the flight controller, camera, gimbal, and other electronics.
This layout makes sure that even during full-throttle maneuvers, every part of the drone still receives enough voltage to keep working correctly.
What – What are power connectors and cables?
Connectors & Cables = The plugs and paths that carry current
Connectors are the plastic-and-metal plugs that let you easily attach and remove the battery or modules. Power cables are the insulated copper wires that link everything together.
Why – Why do small connectors matter so much?
A loose or damaged connector can instantly cut power and cause a crash.
Undersized cables can get hot and waste energy as heat.
Good contact surfaces reduce voltage drop, helping motors produce full thrust.
How – How should pilots care for connectors and cables?
Before flight, pilots should check that the battery plug clicks firmly into place and that no cable insulation is broken or pinched between parts of the frame. After many flights, slightly dark or loose connector pins can be cleaned or replaced to keep the power path healthy.
What – What is power monitoring & battery safety?
Power Monitoring & Battery Safety = Knowing how much energy you have, and how to protect it
This system covers everything related to reading battery status during flight, and protecting the battery during charging and storage.It helps pilots understand remaining endurance, avoid unsafe power levels, and improve long-term battery health.
Why – Why is this important for every drone pilot?
It prevents harmful over-discharge that can reduce battery lifespan or trigger sudden shutdown.
It extends battery life through healthier charging and storage habits.
It improves flight safety by reducing risks such as overheating, swelling, or abrupt power loss.
How – How does it work in real use?
During flight (Power Monitoring)
Check live battery percentage on the app or controller screen to judge remaining flight time.
Low-battery alerts and Return-to-Home automation help avoid emergency landings.
Before & after flight (Charging & Care)
Always use the original charger, and allow hot batteries to cool before charging again.
For long-term storage, keep batteries around 40–60% charge to slow chemical aging.
Fast charging requires the correct battery protocol, sufficient charger wattage, compatible cable, and proper temperature. Otherwise, charging will not accelerate.
With good monitoring in the air and proper care on the ground, batteries deliver longer, safer, and more reliable flight performance.
Extra – What is a Smart Battery (BMS), and why does it matter?
Some mid-range and high-end drones use a Smart Battery with an internal Battery Management System (BMS) — a tiny onboard computer that monitors health and protects the cells.
Typical Smart Battery functions include:
Accurate percentage display instead of guessing by LED lights.
Automatic storage mode — unused full batteries slowly drop toward 40–60% to reduce aging.
Charge and discharge protection against over-charge, over-discharge, and temperature extremes.
Important Note:
If a full battery drops to around 40–60% after sitting for several days, this is a self-protection feature, not damage, and not a defect.
Don’t Misunderstand:
Many users think “the battery lost charge by itself” is a fault, but this is called automatic storage mode, designed to slow long-term aging.
Reality Check:
Not all drones have Smart Batteries. Basic batteries do not self-discharge and must be manually stored at 40–60% by the user.
Extra – 10 real-world battery facts every pilot should know
1. Temperature affects everything:Cold reduces voltage, flight time, and thrust; heat speeds aging and may restrict fast charging or takeoff.
2. Flying fast drains power faster:High-speed moves massively increase current draw, reducing endurance.
3. Added weight reduces endurance:Filters, guards, gimbals, and accessories increase load and shorten flight time.
4. Hovering uses more energy:Holding position requires constant thrust, usually consuming more power than smooth forward flight.
5. Batteries naturally age:After 100–200 full charge cycles, shorter flight time is normal, not a defect.
6. Low battery levels are risky:Flying below 5% risks sudden shutdown; land around 20–30%.
7. Wind changes power draw:Headwinds increase current demand; tailwinds make return flights more efficient.
8. Fast charging needs full support:The battery, charger wattage, cable, and temperature must all match — or speed will fall back to normal.
9. Storage charge prevents damage:Long-term full or empty storage accelerates wear; 40–60% is ideal for resting batteries.
10. Real flight time is shorter than ads:Wind, temperature, flying style, weight, and video recording typically reduce endurance by 15–35%.
Propulsion & Airframe System (Thrust & Structure System)
The drone’s Propulsion & Airframe System is the part that turns electrical power into thrust and safely carries all the hardware in the air. It includes the motors that generate thrust, the propellers that turn rotation into lift, the frame and arms that hold everything in place, and the landing gear that supports takeoff and landing. Together, these parts decide how strong the thrust is, how agile the drone feels, and how well it survives everyday bumps and landings.
What – What is a drone motor?
Motors = The power source that lifts and controls the drone
Drone motors spin the propellers at high speed to create lift, and by changing motor speed, drones climb, descend, turn, and hover. Motors work together with the flight controller, ESCs, and propellers to form the full propulsion system.
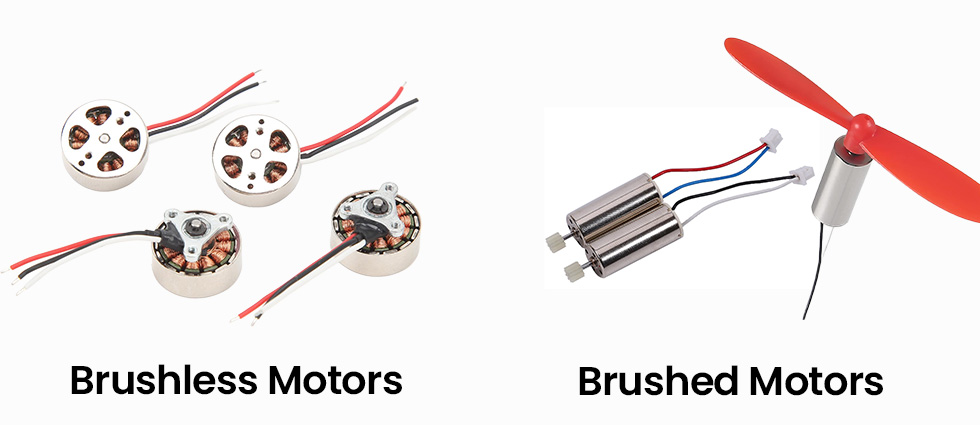
Consumer drones mainly use two motor types: brushed motors and brushless motors. They differ greatly in power, lifespan, noise, efficiency, and price.
Why – Why do motors matter so much for flying experience?
Power & thrust: Stronger motors climb faster, accelerate harder, and handle added weight such as gimbals or filters.
Wind resistance & safety: Bigger motors + bigger props can push against wind better, especially at beaches, on hills, or in open fields – giving pilots confidence.
Stability & video quality: Smoother motor control means less vibration, easier stabilization, and cleaner video from the gimbal.
Flight time: Higher efficiency motors can noticeably extend real-world flight time.
Noise level: Brushless motors sound more like steady wind, while brushed toy drones produce a loud “buzzing” noise that many people find unpleasant.
Confidence & control feel: Strong motors respond faster, feel more direct, and resist being pushed off path by gusts.
How – How do motors work during flight?
During flight, the flight controller constantly sends commands to the ESCs, which adjust motor RPM hundreds of times per second:
Throttle up → all motors spin faster → the drone climbs. Throttle down → motors slow → the drone descends. Forward flight → rear motors spin faster → drone tilts forward. Turning → motors on opposite sides speed up and slow down accordingly.
Brushless motors work together with ESCs as a performance pair: the ESC controls electrical timing and protection, while the motor delivers torque and thrust – this combination is why camera drones feel so smooth.
Extra – Motor Types, Power Levels, and How to read motor model numbers
Motors define the “power character” of a drone. Here are the most important points consumers should understand when comparing drones:
Brushed vs Brushless Motors
Brushed motors: cheaper, simpler, more noise, shorter life, more suited to indoor toy-class drones.
Brushless motors: stronger torque, better efficiency, longer lifespan, quieter sound, and are the standard for GPS and camera drones.
How to judge motor power using model numbers?
Motor model numbers such as 1503 / 1806 / 2204 / 2306 indicate physical size:
First two digits = stator diameter (mm) – bigger diameter = stronger torque and higher thrust.
Last two digits = stator height (mm) – taller stators hold more windings and sustain power longer.
General rule of power levels: 2306 motors > 2204 motors > 1806 motors > 1503 motors.
Bigger motors handle larger propellers, heavier drones, and stronger wind — giving better lift, takeoff strength, and outdoor stability.
Efficiency, Noise, & Durability
Efficiency affects flight time: two drones with the same battery capacity may fly 20–40% different durations.
Sound quality differs: brushless motors produce smooth wind-like sounds, brushed produce loud buzzing.
Lifetime: brushless motors rarely fail in normal consumer use; brushed motors wear down and need replacement.
In short: larger and more efficient motors = more power, better wind resistance, longer lifespan, quieter sound, and a more confident flying experience.
What – What is a Drone Propeller?
Propeller = The drone’s spinning wings
Drone propellers are the spinning blades that create lift and steering force for the aircraft. When the motors drive them at high speed, they push air downward so the drone can take off, hover, move forward, backward, or sideways. Without propellers, a drone simply cannot fly.
Basic parts of a propeller
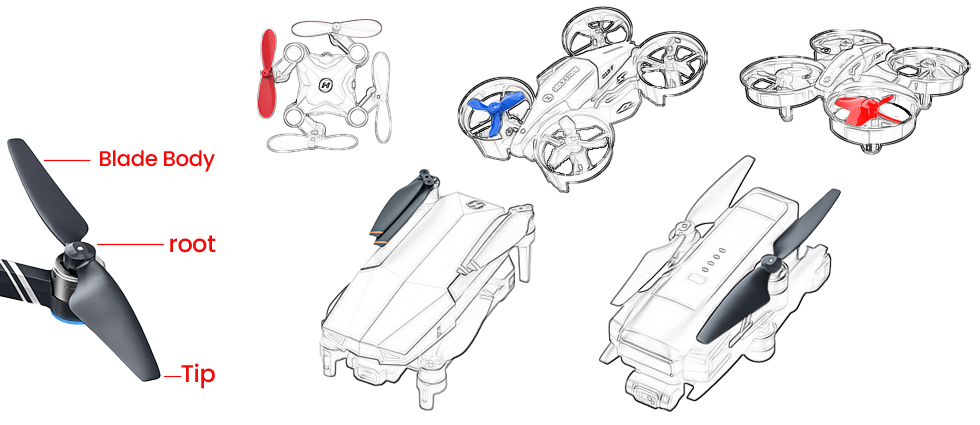
A typical drone propeller is made of three key areas:
Root – The inner end that connects to the motor. It is the strongest part of the blade and carries most of the mechanical load during high-speed spin.
Blade body – The middle curved section that cuts through the air. Its airfoil shape and twist generate most of the lift and decide how stable and efficient the propeller is.
Tip – The outer end of the blade, where the speed is highest. The tip shape strongly affects noise and efficiency: smoother tips can reduce wind noise, sharper or wider tips can increase thrust but also make more noise. Tip damage is one of the most common causes of vibration and unstable flight.
In consumer drones, propellers usually come as matched pairs of CW (clockwise) and CCW (counter-clockwise) blades. These pairs are arranged on opposite corners of the drone to balance torque and keep the aircraft stable.
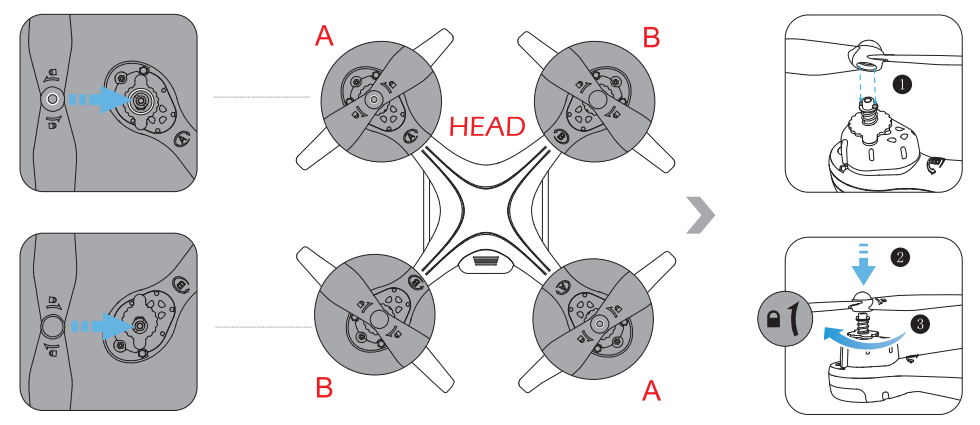
Safety tip – The most common propeller mistake
Always match each propeller to its motor mark: A → A, B → B, CW → CW, CCW → CCW. One reversed propeller can make the drone flip on takeoff, slide violently to one side, or fail to lift at all.
Common propeller types on consumer drones
| Propeller type | Typical usage | Description |
|---|---|---|
| CW / CCW pairs | All multi-rotor drones | Clockwise and counter-clockwise blades mounted on diagonal arms to balance torque. |
| Folding propellers | Portable / camera drones | Blades fold inward for transport and swing out under centrifugal force during flight. |
| Fixed propellers | Entry-level / racing drones | Simple one-piece structure, often lighter and more rigid, but less compact to carry. |
| Quick-release props | Most modern camera drones | Push-and-twist locking hubs for fast installation and removal without tools. |
| Screw-mounted props | Older or DIY models | Secured by screws on the motor shaft; require tools and correct tightening torque. |
Why – Why are propellers critical for safe and stable flight?
Propellers are not just “plastic blades on the corners” – they directly decide whether the drone can fly safely, smoothly, and quietly. Even if the electronics and sensors are perfect, bad, damaged, or incorrectly installed propellers can ruin the entire flight.
They generate all the lift and thrust, so any imbalance or wrong installation shows up as shaking, drifting, or poor climbing power.
They are among the most exposed and fragile parts of the drone, often hitting the ground, walls, or branches during hard landings or crashes.
Their sharp, fast-moving edges can cause real injuries if hands, faces, or clothing get too close during spin-up or landing.
The motors, ESCs, and flight controller are tuned around the original propeller size and type. Random third-party propellers can overload the system or break the tuning balance.
This is why checking, installing, and replacing propellers correctly is one of the most important habits for any drone pilot, beginner or expert.
How – How do propellers work in flight?
A spinning propeller works like a rotating wing. As it turns, the curved blade pulls air from above and pushes it downward, creating an upward reaction force that lifts the drone. By changing how fast each propeller spins, the flight controller can move the drone in any direction.
Lift and hover – All four propellers spin at similar speeds, pushing air down evenly so the drone can rise or hold a stable hover.
Move forward / backward / sideways – The rear or side propellers spin a little faster while the opposite side spins slower. This tilts the drone and redirects some thrust horizontally, making it slide in the desired direction.
Turn (yaw) – CW and CCW propeller pairs change speed in opposite ways. This creates a small torque difference that rotates the drone left or right around its center.
For these movements to feel smooth and natural on the sticks, each propeller must be the correct type, installed in the right place, firmly attached, and free from cracks or bends. Even a small defect at the tip can be magnified when the blade spins thousands of times per minute.
Extra – How should pilots care for the propellers?
Safety tip – Daily care and handling
Inspect propellers before every flight for cracks, chips, bends, or whitening of the plastic, especially near the tips and roots. Replace the entire set if you are unsure. Use a flat, clean takeoff pad instead of loose gravel, sand, or tall grass, and keep children, hands, and pets away from spinning blades.
Do Not:
Do not continue flying after a hard crash or propeller strike without checking the blades. Do not mix different brands or sizes of propellers on the same drone. Do not hold the drone in your hand for takeoff or landing unless you are highly experienced and fully aware of the risks.
Risk:
Poor propeller condition or handling may cause strong vibration, unstable hovering, loss of control, motor overload, broken gimbals, or serious injury from high-speed blades. When in doubt, stop flying and replace the propellers.
When pilots build these habits, the propellers can reliably turn motor power into clean, stable thrust, helping the flight controller keep every flight smooth, predictable, and enjoyable.
What – What are the frame & arms?
Frame & Arms = The skeleton that holds everything together
The frame is the central body of the drone, and the arms extend outward to hold the motors and propellers. They set the drone’s shape (for example X-type quadcopter) and keep components aligned so that all forces balance correctly in flight.
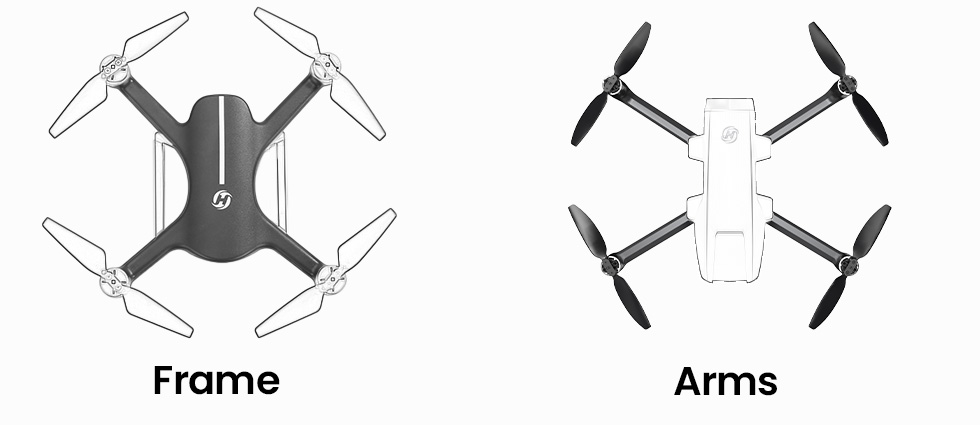
Why – Why are frame stiffness and layout important?
A stiff frame reduces flexing, which keeps the drone’s sensors and camera stable.
The arm length and angle decide how far the propellers are from each other, affecting stability and agility.
Good layout makes it easier to route cables safely and cool the electronics.
How – How does the frame protect and support the drone?
The frame provides mounting points for the flight controller, GPS, camera, battery, and other modules. It also absorbs part of the energy during minor bumps or hard landings, helping to protect delicate electronics and keep the drone flying true over many flights.
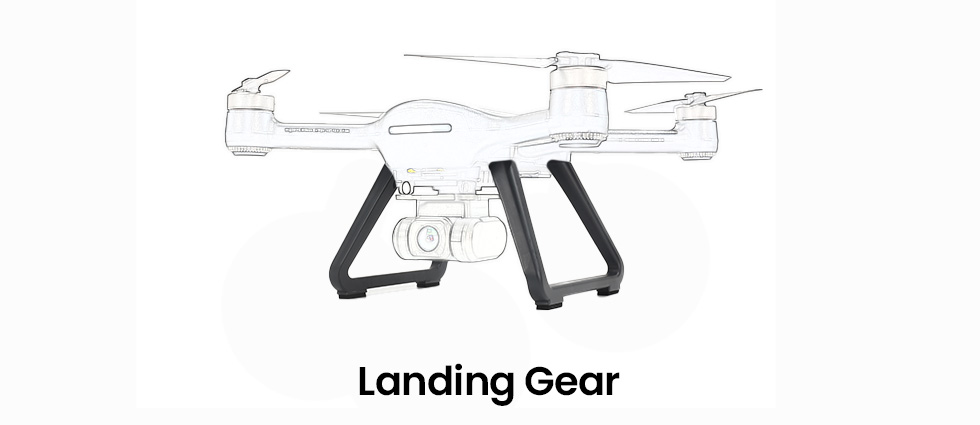
What – What is the landing gear?
Landing Gear = The feet of the drone
The landing gear is the structure that touches the ground when the drone takes off and lands. It can be fixed legs, folding feet, or extended skids, and is often designed to keep the propellers and camera away from dust, grass, and small stones.
Why – Why does landing gear design matter?
Good landing gear spreads impact forces and reduces the chance of tipping over.
Enough height keeps the camera and gimbal from hitting the ground.
Wide stance legs improve stability on uneven surfaces.
How – How should pilots use and protect the landing gear?
Pilots should choose flat, clear areas for takeoff and landing whenever possible, and avoid rocks, tall grass, or puddles. After a hard landing, it is worth checking the legs for cracks or bending, because damaged landing gear can affect the drone’s balance or scratch the camera on the next flight.
Wireless Communication System
The Wireless Communication System is the invisible bridge between your drone and remote controller. It carries your stick and button commands up to the drone, and sends live video plus status data back down to your screen. In a typical consumer drone, this system is built from three data links (control, FPV video, telemetry) working on specific frequency bands and channels, using dedicated antennas. On top of these links, fail-safe rules decide what the drone does when the signal becomes too weak or is completely lost – they are rules based on the existing links, not a new, separate radio path.
What – What is the Remote Control Link?
Remote Control Link = The wireless control system that allows the drone to “understand” pilot commands
The Remote Control Link is the communication system that converts your joystick and button inputs into wireless control signals and sends them to the drone, allowing it to perform flight actions.
It performs three key functions:
① Binding (Pairing)
Before first use, the drone and the remote must be paired to confirm identity and avoid signal confusion or controlling the wrong drone.② Sending flight commands
Your stick movement and button actions are transmitted through 2.4GHz / 5GHz frequency bands to drive the drone to take off, move, hover, turn, or land.③ Returning status information
The drone sends basic status back to the controller or app, such as signal strength, weak signal warnings, and link-loss alerts.
⚠ Note: Live camera video belongs to the “FPV Video Link,” not the Remote Control Link, even if they sometimes use the same radio band.
In one sentence: Without the Remote Control Link, the drone cannot be controlled. A stronger link means safer and more stable flight.
2.4GHz vs 5GHz Frequency Comparison
| Band | Main Features | Recommended Environment | Usage Tips |
|---|---|---|---|
| 2.4GHz | Stronger penetration and longer control range. | Open outdoor fields with low interference. | Choose it for long-range flights, but keep the drone within visual line of sight. |
| 5GHz | Cleaner band, lower interference, smoother response. | Cities and parks with many Wi-Fi signals. | Great for short-to-medium flights; watch for weak signal alerts. |
Why – Why does the control link weaken in real flight?
Real flight environments are far more complex than laboratory testing. The following factors cause real-world range to be shorter than manual specifications:
Physical obstruction:Trees, buildings, and metal objects absorb radio signals.
Radio interference:Wi-Fi, Bluetooth, hotspots, or cellular towers pollute radio channels.
Body blocking:The human body contains water and absorbs signal energy.
Antenna angle errors:Pointing antennas directly at the drone gives the weakest signal; the side surface gives the strongest radiation.
Low battery power:Low remote battery reduces output power and weakens transmission strength.
Specification numbers are based on ideal open testing ranges; normal field conditions are never identical.
How – How to keep the Remote Control Link strong and stable?
These simple flying habits can significantly improve link stability and safety:
Correct antenna positioning:Keep antennas vertical and let the antenna sides face the drone.
——Reason: Antennas radiate strongest from the side surface, not the tip.Maintain visual line of sight:Avoid flying behind buildings, hills, or deep into forests.
——Reason: Obstacles absorb radio waves and cause signal drops.Select the right frequency:2.4GHz outdoors; 5GHz in Wi-Fi-dense cities.
——Reason: Band characteristics vary by environment.Avoid interference areas:Stay away from power lines, routers, and industrial RF sources.
——Reason: RF noise disrupts link quality.Keep remote battery high:Ensure the controller has enough power before flight.
——Reason: Transmission power depends on battery level.Do not let the drone fly behind you:
——Reason: The human body blocks and absorbs RF energy.
Extra – Frequently Asked Questions
Q1: Why is real control distance shorter than specifications?
Specifications are measured in interference-free open fields; real-world environments are different.
Q2: What happens if the Remote Control Link drops?
The drone triggers fail-safe protection and attempts to Return-to-Home.
Q3: What is the difference between RC Link and FPV Video Link?
RC Link controls the drone’s movement; FPV Link transmits the camera video signal.
What – What is the FPV Video Link?
FPV Video Link = The live “eyes” of your drone
The FPV (First-Person View) Video Link is the wireless channel that sends a live video stream from the drone’s camera to your phone or remote controller screen.
It lets you see what the drone sees in real time so you can frame shots, avoid obstacles, and navigate more confidently.
Why – Why do latency and stability matter so much for FPV?
A good FPV link makes flying feel natural and controlled:
Low latency means the image on your screen closely matches the drone’s real position and angle.
Stable signal avoids frozen frames, heavy blocky artifacts, or sudden blackouts.
Consistent quality helps you judge distance and composition and create smooth, cinematic shots.
If latency is high or the video keeps breaking up, pilots tend to over-correct or hesitate, which can lead to poor footage or risky flying.
How – How does the FPV stream travel from the camera to your screen?
The camera sensor sends raw frames to the image processor, which compresses them into a video stream (for example using H.264 or H.265).
The FPV module breaks that stream into packets, applies error correction, and modulates it onto a radio signal on the supported band (for example 2.4GHz or 5GHz).
On the ground, the receiver grabs these radio signals, demodulates them, checks for errors, and feeds the video packets into a decoder.
Your phone or remote controller then rebuilds the frames and displays them as smooth live video.
Extra – Tips for clearer FPV video
Keep the drone and controller antennas unobstructed and avoid flying directly behind buildings or thick trees.
In noisy city areas, staying a bit closer and higher often gives a cleaner FPV link.
Make sure your phone or tablet performance is sufficient so decoding and display do not add extra lag.
What – What is the Telemetry & Status Link?
Telemetry Link = The “health report” coming back from the drone
The Telemetry & Status Link carries live data from the drone back to the pilot.
It includes information such as GPS position, flight mode, battery level, signal strength, and sometimes even motor or sensor warnings. The data volume is small, but it is updated frequently like a continuous health report.
Why – Why is telemetry crucial for safe flying?
Without telemetry, you would be flying almost “blind” regarding the drone’s status:
Battery level tells you when it is time to come back safely, not after it is already too late.
GPS and mode information show whether the drone is in GPS hold, ATTI mode, or Return-to-Home.
Signal strength indicators help you avoid flying deeper into a weak coverage zone.
Telemetry is also what the flight controller and app rely on when making decisions for low-battery or lost-link actions – it provides the numbers that fail-safe rules use.
How – How is telemetry sent and displayed?
The flight controller and other onboard modules continuously generate status data.
This data is packed into small telemetry frames and sent back through the same or a parallel radio link that shares the drone’s working band and antennas.
On the ground, the remote controller or app decodes those frames and updates on-screen indicators: battery icons, satellite counts, maps, distance and height readouts, signal bars, and warning messages. When the system detects that control frames are missing or signal quality stays too low, the fail-safe logic uses GNSS, barometer, and home-point data to decide whether to hover, Return-to-Home, or land.
Extra – Use telemetry like a “dashboard” and a fail-safe helper
You can think of telemetry as both a dashboard for the pilot and a data source for fail-safe rules:
Check battery, distance, and height regularly – this is what the drone also uses to decide when to trigger low-battery Return-to-Home or landing.
Watch GPS status and mode: if it suddenly leaves GPS mode, it may drift more and fail-safe RTH will also be less precise.
Keep an eye on signal bars; dropping bars mean the system is getting closer to its lost-link threshold.
Before takeoff, confirm that the home point is recorded correctly – this is the position that fail-safe RTH will use if the control link disappears.
Learn what your drone is set to do when the link is gone (hover, RTH, or land in place), and avoid flying behind tall buildings or far beyond visual line of sight so fail-safe has enough room to work safely.

COMMENTS